


Apple TV2 serial port, part 1
Wherein I violate a warranty and expose hidden features of the second-gen Apple TV.
N.B. that this project certainly violates any warranty and has the potential to brick your device. Furthermore, Apple probably really doesn’t want anyone to do this - adverse consequences could include revocation of your iOS development license or Steve Jobs’ ghost returning from the grave to haunt you. Such an outcome would not be my fault: undertake this project at your own risk.
I have no idea why I have an Apple TV. Given my media consumption patterns, there’s no sane reason for possessing one: I don’t watch TV or even have monitor that can deal with HDMI audio output. It was a most uncharacteristic impulse purchase, which (I suspect) was primarily motivated by how nice the Apple remote looked. No idea what I was thinking - must have been something to do with being on vacation in Cleveland! I quickly rooted it, played with the underlying operating system (iOS is just a BSD, after all), did a bit of iOS development, and then entirely forgot about it.
However, the Apple TV 2 is a pretty impressive device: it contains a 1 GHz A4 (ARM7), 256 Mb of RAM, 8 Gb of flash memory, Ethernet/WiFi/Bluetooth networking, and 720p video output. Furthermore, as the hardware is essentially re-purposed mobile hardware, the power consumption is ridiculously low - 6 W, from the internal markings on the power supply. The newer hardware revision is even more powerful, as the A4 has been replaced with an A5 with 512 Mb RAM, but unfortunately isn’t yet root-able and has slightly different internal pinouts. Combined with decent price (~$99), this makes the Apple TV somewhat competitive with the legions of small ARM devices targeted at developers (cf. the BeagleBone, pandaboard, and Raspberry Pi). Competitive, that is, in everything except in interfacing with other hardware, as the Apple TV (obviously!) lacks any exposed GPIO, I2C, or serial ports.
Fortunately, someone somehow discovered that there is an easily-exposed serial port - breaking this out would allow me to connect the device to another board (in my case, an Arduino Mega), and thence to any number of input/outputs. Thus, yesterday, in a fit of summer leisure, I decided to rip my Apple TV apart and make said modifications.
Prerequisites
- A rooted second-generation Apple TV
- Something capable of generating serial traffic at 3.3v
- A spudger, or the equivalent. I used two butter knives.
- Very fine insulated wire, preferably in four colors
- A quality soldering iron, capable of fine SMT work and soldering to large ground planes. My Hakko FX-88. was very helpful for this.
- Something to remove the EMI shield - Metrix has some awesome probes for this, but anything sharp works…
- Small Phillips screwdriver
- A bit of epoxy
- Small tin snips
1 - Remove the logic board
ifixit has a very set of instructions for doing this. I do, however, suggest using an anti-static strap connected to the device’s ground. The exposed metal cases for the outputs are a convenient location. Note that the connector for the status LED lifts directly up from the board.
2 - Cut a hole in the EMI shield
After removing the largest EMI shield from the board, cut a small hole in both the top and bottom halves. This hole allows the wires that will be attached to the TX/RX pins to exit the shield - size and locate the hole accordingly. I used a dremel on the top half, but then switched to metal snips for the bottom half: it is imperative that none of the metal fragments/dust remain on the circuit board. At this point, I reconnected the power supply and status LED so that I could check that I hadn’t bricked the device.
 Original photo: ifixit
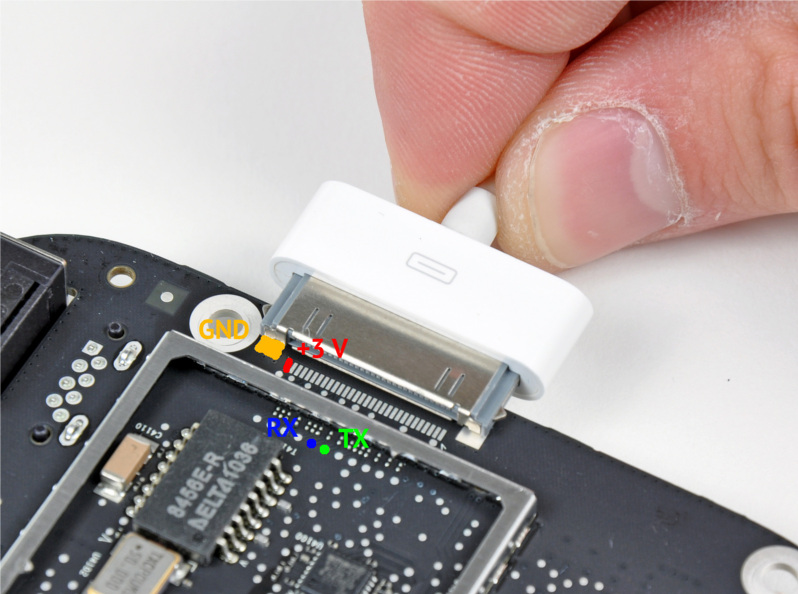
3 - Solder breakout wires
Carefully solder a ~5cm wire to each of the labeled pins in the previous image - the +3 v pin is optional, unless you want to install an isolator board (more on that latter). This is, of course, the tricky part. Oddly enough, I had the most trouble with the ground pin, as the rest of the board acts as a massive heat sink.
4 - Reassemble and test
Replace the EMI shield and reconnect the power and status LED cables. Then connect the Apple TV to your source of serial traffic - ATV ground connects to serial ground, ATV TX connects to serial RX, and ATV RX connects to serial TX. N.B. that the serial port used MUST BE 3.3v, at 9600 baud, 8 bits, no parity, and 1 stop bit. Then boot the ATV, ssh into it, and cat /dev/tty.console. Serial port traffic should await:

5 - Reinforce with epoxy and reassemble
I used a bit of epoxy to reinforce the connection between the circuit board and wires - pulling a pad off the board would really suck. At this point, reassemble the Apple TV.
Future Work
I feel slightly uncomfortable connecting my fancy Apple hardware to random development boards - thus, I’m currently working on a small board to isolate the two systems, using Analog’s ADuM1201.